We’ve all been there – watching a video with amazing content, yet the lighting just doesn’t do it justice. Maybe it was a cloudy day, or perhaps the indoor lights didn’t quite hit their mark. Whatever the reason, a video lacking brightness can fall flat, failing to capture and maintain viewer interest. When videos are properly lit, they appear more vibrant, engaging, and professional, making the content far more appealing.
This is where Animotica comes into play. With its intuitive, user-friendly interface, Animotica is the go-to tool for enhancing video brightness on Windows 10/11. Not only does it offer powerful adjustment features, but it also makes the process accessible to everyone from beginners to seasoned content creators.
“Brightness isn’t just about visibility – it’s about creating the right mood and atmosphere to truly engage your audience.”
From correcting poorly lit footage to adding a splash of vibrancy, brightening videos allows you to transform your content, making it more eye-catching and memorable. Let’s dive into the step-by-step guide on how you can brighten your video using Animotica.
Contents
Why Brightening Your Videos is Essential
Picture this: you’ve captured memories from your vacation or filmed a story indoors, and the footage is too dark to see colors and expressions clearly. Brightening your videos can turn these dark moments into vibrant visuals, making them more exciting and enjoyable to watch.
Brighter videos can also change how people perceive your content. Studies suggest that videos with higher brightness can lead to more viewer interaction. For example, research on platforms like TikTok shows that brighter videos tend to get more likes and comments, especially in fact-checking and advertising. Brightness enhances clarity, catching viewers’ attention and improving their experience.
Brighter videos not only capture attention but also express emotions more effectively. This is vital for creators who want to connect with their audience. Whether you’re a teacher making your lessons clearer or a blogger adding some flair to your vlogs, boosting brightness can make a significant difference.
Why Do Videos Appear Dark?
There are several reasons why videos may appear darker than desired. One of the most common issues is poor lighting conditions during filming, which can leave your footage lacking vibrancy and clarity. Natural light can be unpredictable, and shooting indoors with insufficient artificial lighting often results in underexposed videos. To learn more about effective lighting techniques, check out our guide on best lighting for your videos.
Another factor could be camera settings. If your camera’s exposure, aperture, or ISO settings are not optimally adjusted, it can lead to darker recordings. Additionally, cameras may automatically reduce exposure in bright environments, causing an overall dull appearance in the output.
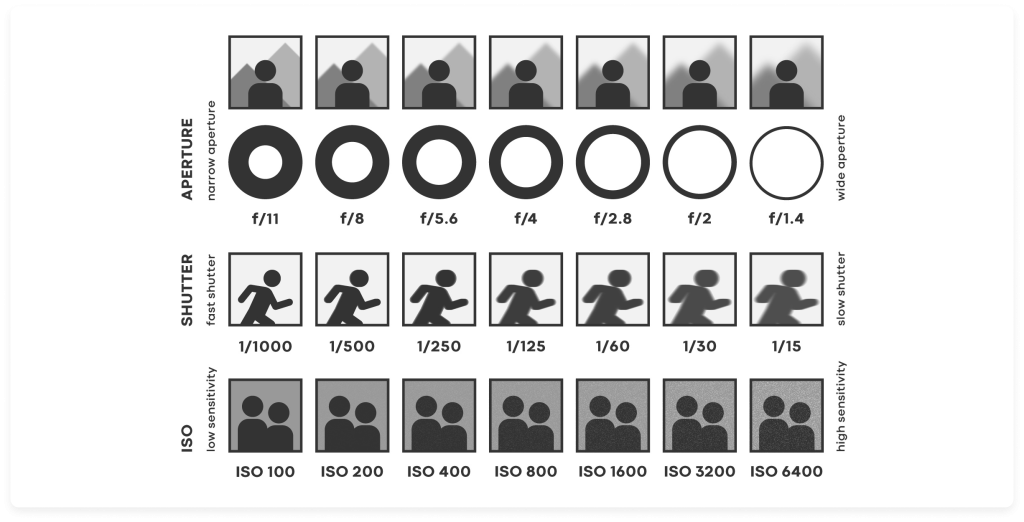
Technical factors such as playback settings also influence video brightness. Different devices and platforms may have varied brightness and contrast settings, which can impact how bright your video appears to viewers.
How to Brighten Videos in 4 Quick Steps
Have you ever captured a great moment on video, only to find it looked dull and shadowy? Fret not! Brightening up your videos is a breeze with Animotica. Whether you’re a content creator, educator, or just someone who loves capturing life’s moments, enhancing your video’s brightness can make all the difference. Discover how simple it is to transform your footage into vibrant, eye-catching content with these four straightforward steps!
1. Download and Start Animotica
Getting started with Animotica is a breeze! First, head over to the Microsoft Store on your Windows device. Simply type “Animotica” into the search bar and click on the app to view its page. Click the “Get” or “Install” button, and the download will begin.

Once installed, launch Animotica by clicking its icon on your Start menu or desktop. Before moving on, make sure to update the software to the latest version for the best experience and access to all the latest features. Keeping your software updated ensures that you benefit from any bug fixes or new tools that enhance the overall functionality.
With Animotica up and running, you’re ready to dive into your video project. Its user-friendly interface welcomes you with easy navigation and intuitive options, making it accessible for beginners yet robust enough for more experienced users.
2. Create a New Project and Add Your Videos
Once Animotica is up and running, it’s time to dive in! Begin by selecting the New Project option on the main interface. This action will guide you to a blank canvas, ready for your creativity.
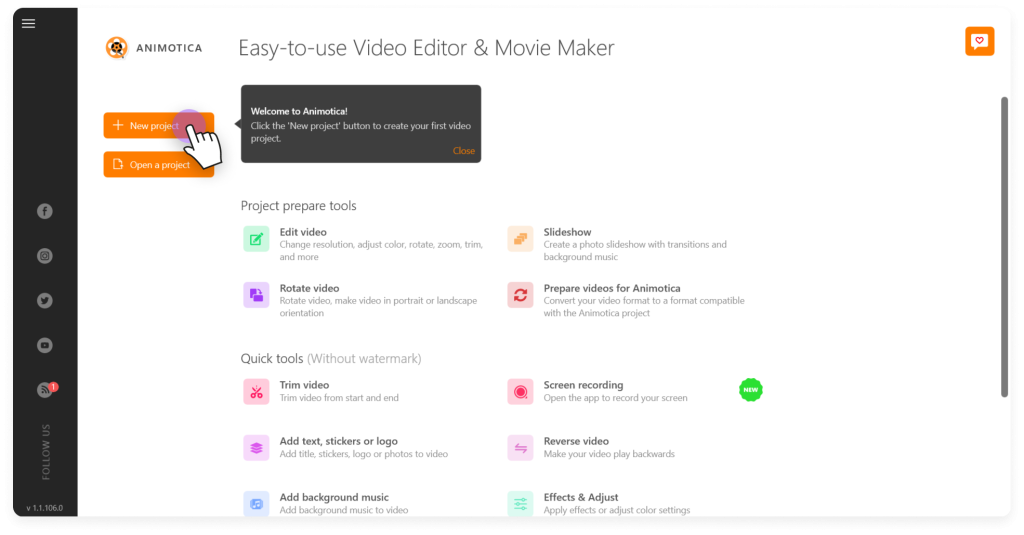
Next, you’ll be prompted to add your video files. Simply click the Add Video/Photo Clips button. This will allow you to upload a variety of video formats, reassuring you that Animotica supports multiple file types.

Whether your footage is in MP4, AVI, or MOV format, Animotica seamlessly integrates them into your project. The multi-format support makes it a versatile choice for users with different video sources.
3. Adjust Video Brightness
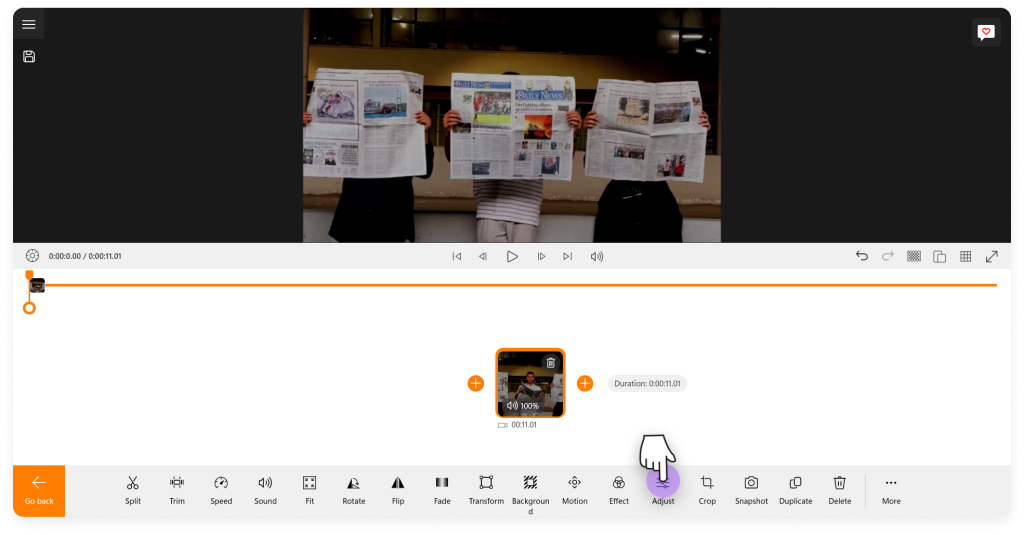
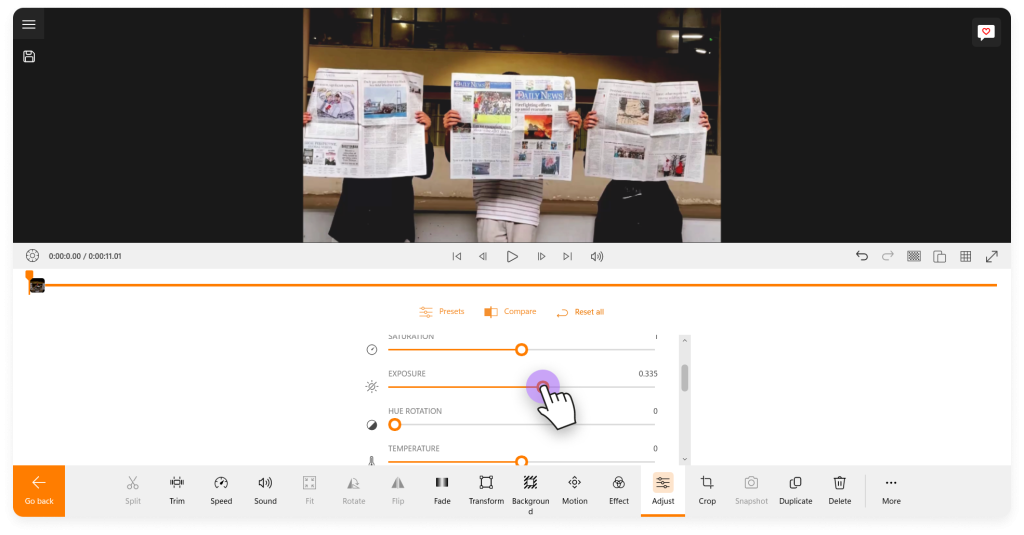
Select the video clip you want to brighten from the timeline. Once selected, a toolbox filled with editing options will appear. Focus on the Adjust tools section, where you’ll find sliders for modifying properties such as brightness, contrast, hue, and saturation.
To enhance the brightness of your video, move the Brightness slider towards the right. This can be adjusted from 0 to 2, with 2 being the most vibrant.
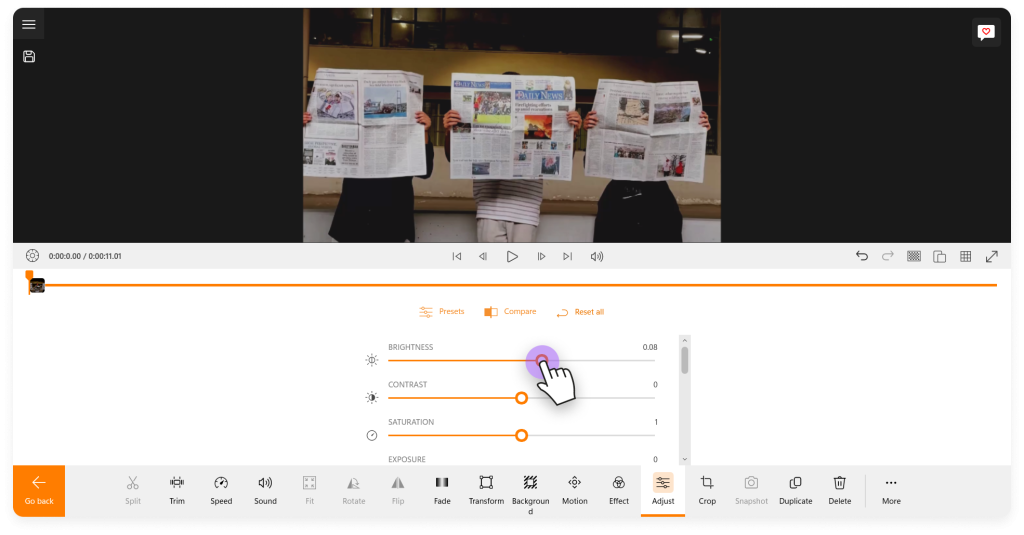
It’s important not to overlook the Exposure setting, especially if your video has areas that are too dark or light. Increasing exposure lightens only the darker parts of your footage, giving more detail in shadows while retaining highlights. A gentle balance between brightness and exposure can work wonders in making your video look professional and engaging!
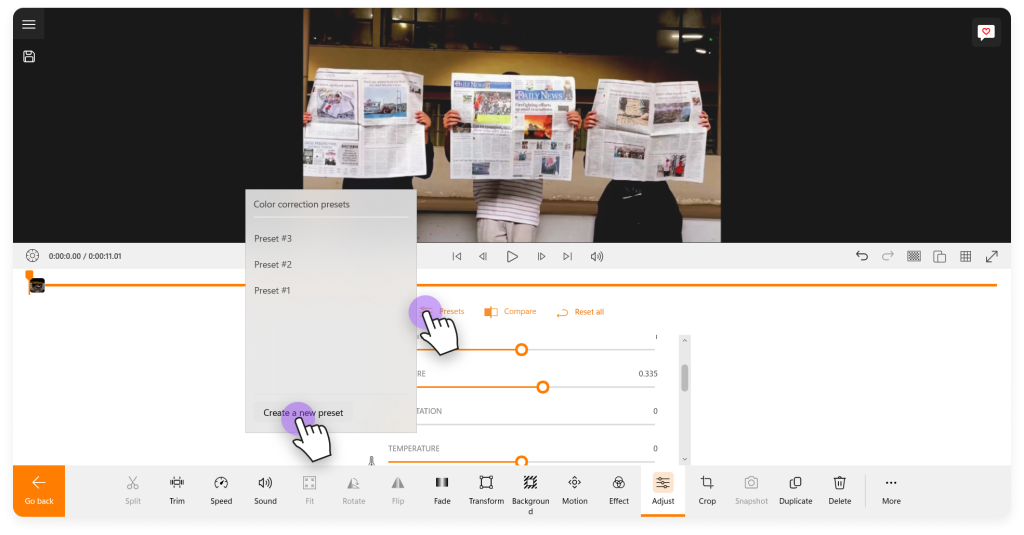
If you discover a perfect combination of brightness and exposure settings you’d like to reuse, click on the Presets button to save them. These presets can save you time in future projects by automatically applying the same adjustments.
4. Export the Brighten Video
Once you’ve adjusted your video’s brightness to perfection, it’s time to export and share your creation with the world! This step is crucial as it determines the quality and compatibility of your video across different platforms.
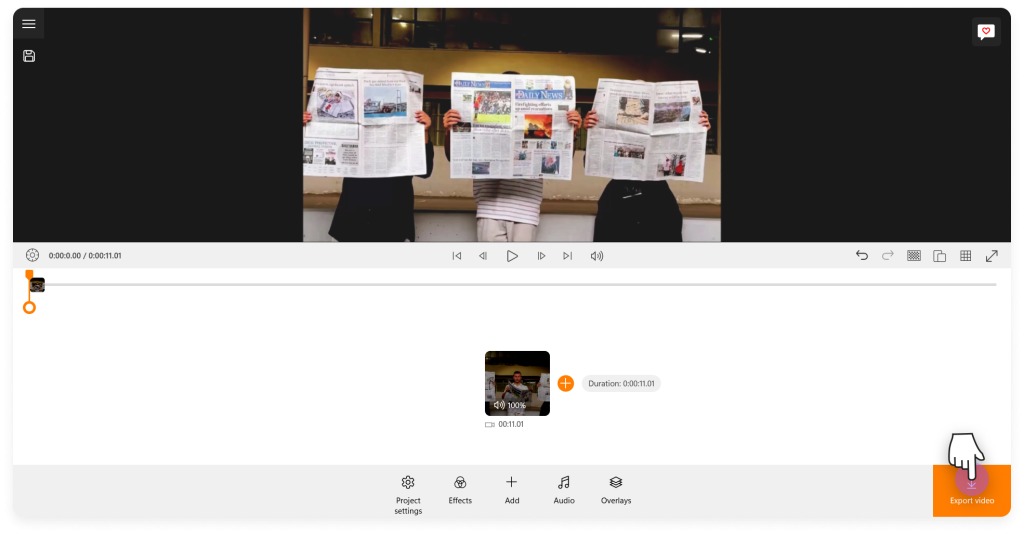
Begin by clicking on the Export Video button, which will guide you to the export options.
Here, you can choose your video’s resolution to match the platform’s requirements. For instance, opt for 1080p if you plan to upload on YouTube, which ensures high-quality playback. On the other hand, 720p works perfectly for social media, providing a good balance between quality and file size.
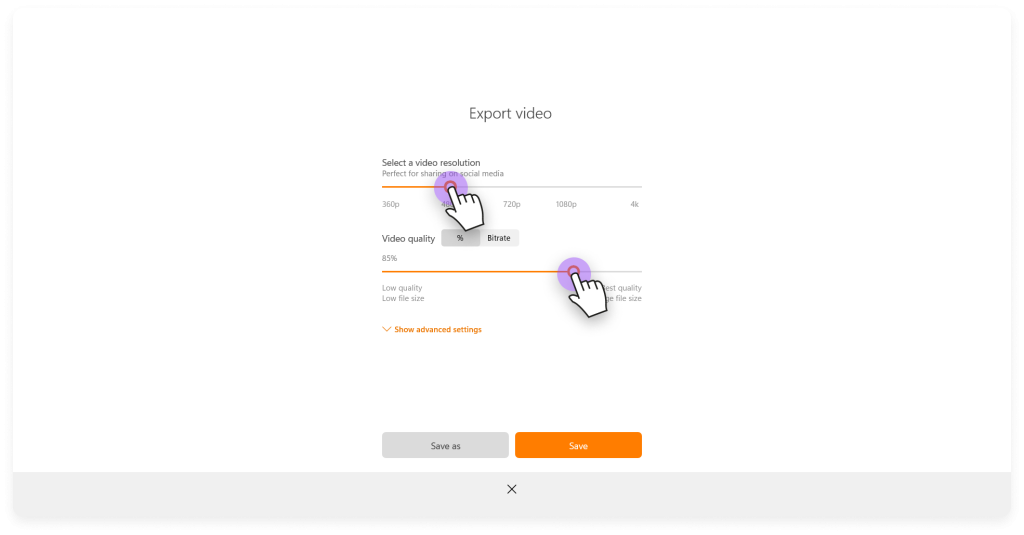
Moreover, you’ll find options to adjust the bitrate, which influences the clarity and smoothness of your video. Higher bitrates generally mean crisper visuals but at the cost of larger file sizes. Animotica’s interface will help you easily navigate these options, making sure you achieve the best result according to your needs.
Once you’re satisfied with your settings, click Save As and choose the folder where you want to save your brightened video.
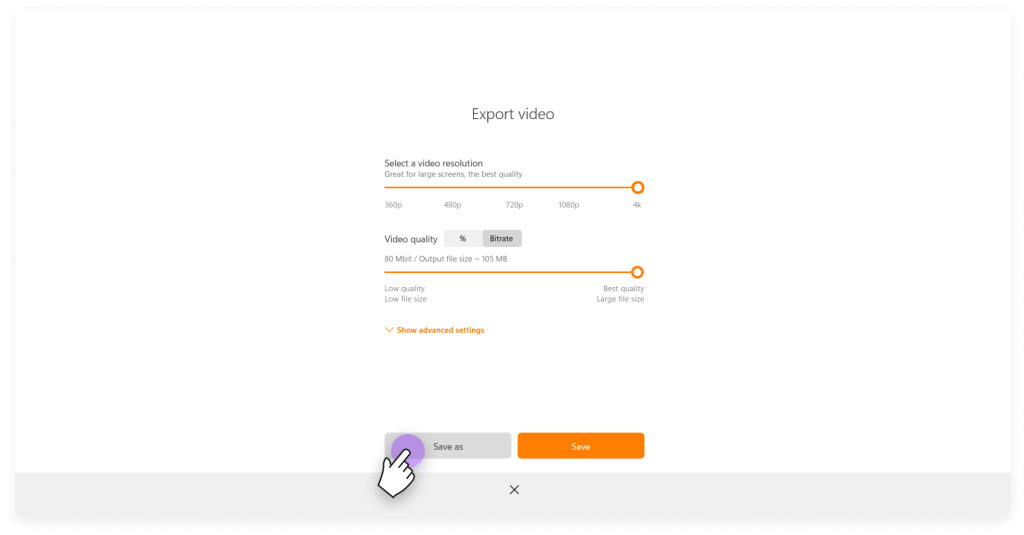
Animotica will then process and save your video, allowing you to share your newly brightened content on any platform you choose. Whether it’s a professional project or a personal video, you’ll be proud of the high-quality result made possible by Animotica!
Your Next Steps for Brightening Videos
Now that you’ve mastered the basics of brightening your videos using Animotica, it’s time to explore further possibilities to enhance your video content. Consider experimenting with the contrast, hue, and saturation settings to see how they can add depth and vibrancy to your footage. Each video is unique, so take a moment to play around with these adjustments to find what works best for your specific content.
While brightening is one step to optimizing your videos, consider diving into other exciting features that Animotica offers. This versatile tool is more than just a brightness adjuster. Explore features such as chroma key, video blending, text overlays, and transitions to make your videos pop and maintain viewer engagement.
If you’re interested in learning more about video editing techniques or Animotica’s capabilities, be sure to check out our other comprehensive tutorials. We cover everything from basic video editing to advanced effects that can make your videos stand out.
Want to see your videos truly shine? Start your creative journey with Animotica now! Download Animotica and explore all that it has to offer for your video editing endeavors.

Remember, the right adjustments can transform a simple video into a memorable one. So, keep experimenting, learning, and most importantly – have fun editing!
FAQ on Video Brightening
Is it possible to brighten a dark video?
Absolutely! With the right tools, you can easily enhance the brightness of a dark video. In Animotica, the Brighten tool offers a user-friendly solution to this common issue. By following a few simple steps, you can significantly improve the visibility and vibrancy of your footage. Whether your video was recorded in low-light conditions or you just want to add a bit more zest, Animotica makes it straightforward. Experiment with the brightness and exposure adjustments to find the perfect balance for your video.
How does brightness differ from exposure in video editing?
Great question! Brightness adjusts the overall lightness or darkness of your video, affecting all elements uniformly. It’s like increasing or decreasing the ‘volume’ of light throughout. Useful for uniformly lighting poorly lit footage. In contrast, exposure fine-tunes specific tonal ranges, brightening darker areas without washing out highlights. This ensures shadow details pop while highlights remain intact. Balance these settings for an engaging, visually appealing video. Decide if you need an overall light lift or a strategic illumination of darker areas.



133 Comments
Can you be more specific about the content of your article? After reading it, I still have some doubts. Hope you can help me.
Your point of view caught my eye and was very interesting. Thanks. I have a question for you.
Your article helped me a lot, is there any more related content? Thanks!
Can you be more specific about the content of your article? After reading it, I still have some doubts. Hope you can help me.
Can you be more specific about the content of your article? After reading it, I still have some doubts. Hope you can help me.
Can you be more specific about the content of your article? After reading it, I still have some doubts. Hope you can help me.
Thanks for sharing. I read many of your blog posts, cool, your blog is very good.
Thank you for your sharing. I am worried that I lack creative ideas. It is your article that makes me full of hope. Thank you. But, I have a question, can you help me?
Your article helped me a lot, is there any more related content? Thanks!
Thank you for your sharing. I am worried that I lack creative ideas. It is your article that makes me full of hope. Thank you. But, I have a question, can you help me?
I don’t think the title of your article matches the content lol. Just kidding, mainly because I had some doubts after reading the article.
I don’t think the title of your article matches the content lol. Just kidding, mainly because I had some doubts after reading the article.
Your point of view caught my eye and was very interesting. Thanks. I have a question for you.
Can you be more specific about the content of your article? After reading it, I still have some doubts. Hope you can help me.
Your article helped me a lot, is there any more related content? Thanks!
Thank you for your sharing. I am worried that I lack creative ideas. It is your article that makes me full of hope. Thank you. But, I have a question, can you help me?
Can you be more specific about the content of your article? After reading it, I still have some doubts. Hope you can help me.
Can you be more specific about the content of your article? After reading it, I still have some doubts. Hope you can help me.
I don’t think the title of your article matches the content lol. Just kidding, mainly because I had some doubts after reading the article.
Your point of view caught my eye and was very interesting. Thanks. I have a question for you.
Can you be more specific about the content of your article? After reading it, I still have some doubts. Hope you can help me.
Your article helped me a lot, is there any more related content? Thanks!
Thank you for your sharing. I am worried that I lack creative ideas. It is your article that makes me full of hope. Thank you. But, I have a question, can you help me?
I don’t think the title of your article matches the content lol. Just kidding, mainly because I had some doubts after reading the article.
Can you be more specific about the content of your article? After reading it, I still have some doubts. Hope you can help me. https://www.binance.info/join?ref=P9L9FQKY
Can you be more specific about the content of your article? After reading it, I still have some doubts. Hope you can help me.
Thank you for your sharing. I am worried that I lack creative ideas. It is your article that makes me full of hope. Thank you. But, I have a question, can you help me?
Thank you for your sharing. I am worried that I lack creative ideas. It is your article that makes me full of hope. Thank you. But, I have a question, can you help me?
Your article helped me a lot, is there any more related content? Thanks!
Your point of view caught my eye and was very interesting. Thanks. I have a question for you.
Can you be more specific about the content of your article? After reading it, I still have some doubts. Hope you can help me.
I don’t think the title of your article matches the content lol. Just kidding, mainly because I had some doubts after reading the article.
Thanks for sharing. I read many of your blog posts, cool, your blog is very good.
Your article helped me a lot, is there any more related content? Thanks!
Your point of view caught my eye and was very interesting. Thanks. I have a question for you.
Thank you for your sharing. I am worried that I lack creative ideas. It is your article that makes me full of hope. Thank you. But, I have a question, can you help me?
Your article helped me a lot, is there any more related content? Thanks!
Thanks for sharing. I read many of your blog posts, cool, your blog is very good.
Can you be more specific about the content of your article? After reading it, I still have some doubts. Hope you can help me. https://www.binance.info/de-CH/register-person?ref=UM6SMJM3
Can you be more specific about the content of your article? After reading it, I still have some doubts. Hope you can help me.
Thanks for sharing. I read many of your blog posts, cool, your blog is very good. https://www.binance.com/tr/register?ref=W0BCQMF1
I don’t think the title of your article matches the content lol. Just kidding, mainly because I had some doubts after reading the article. https://www.binance.com/join?ref=P9L9FQKY
Your point of view caught my eye and was very interesting. Thanks. I have a question for you. https://www.binance.info/ar-BH/register?ref=V2H9AFPY
I don’t think the title of your article matches the content lol. Just kidding, mainly because I had some doubts after reading the article.
Your point of view caught my eye and was very interesting. Thanks. I have a question for you. https://accounts.binance.info/en-IN/register?ref=UM6SMJM3
Thanks for sharing. I read many of your blog posts, cool, your blog is very good.
Your point of view caught my eye and was very interesting. Thanks. I have a question for you. binance US-registrera
Your article helped me a lot, is there any more related content? Thanks!
Thank you for your sharing. I am worried that I lack creative ideas. It is your article that makes me full of hope. Thank you. But, I have a question, can you help me?
Your point of view caught my eye and was very interesting. Thanks. I have a question for you.
Thank you for your sharing. I am worried that I lack creative ideas. It is your article that makes me full of hope. Thank you. But, I have a question, can you help me?
Can you be more specific about the content of your article? After reading it, I still have some doubts. Hope you can help me.
Can you be more specific about the content of your article? After reading it, I still have some doubts. Hope you can help me.
Your article helped me a lot, is there any more related content? Thanks!
I don’t think the title of your article matches the content lol. Just kidding, mainly because I had some doubts after reading the article.
Thanks for sharing. I read many of your blog posts, cool, your blog is very good.
**mindvault**
mindvault is a premium cognitive support formula created for adults 45+. It’s thoughtfully designed to help maintain clear thinking
**mind vault**
mind vault is a premium cognitive support formula created for adults 45+. It’s thoughtfully designed to help maintain clear thinking
Can you be more specific about the content of your article? After reading it, I still have some doubts. Hope you can help me.
Can you be more specific about the content of your article? After reading it, I still have some doubts. Hope you can help me.
**prostadine**
prostadine is a next-generation prostate support formula designed to help maintain, restore, and enhance optimal male prostate performance.
**sugarmute**
sugarmute is a science-guided nutritional supplement created to help maintain balanced blood sugar while supporting steady energy and mental clarity.
**glpro**
glpro is a natural dietary supplement designed to promote balanced blood sugar levels and curb sugar cravings.
**mitolyn**
mitolyn a nature-inspired supplement crafted to elevate metabolic activity and support sustainable weight management.
**zencortex**
zencortex contains only the natural ingredients that are effective in supporting incredible hearing naturally.
**prodentim**
prodentim an advanced probiotic formulation designed to support exceptional oral hygiene while fortifying teeth and gums.
**vitta burn**
vitta burn is a liquid dietary supplement formulated to support healthy weight reduction by increasing metabolic rate, reducing hunger, and promoting fat loss.
**yusleep**
yusleep is a gentle, nano-enhanced nightly blend designed to help you drift off quickly, stay asleep longer, and wake feeling clear.
**synaptigen**
synaptigen is a next-generation brain support supplement that blends natural nootropics, adaptogens
**nitric boost**
nitric boost is a dietary formula crafted to enhance vitality and promote overall well-being.
**glucore**
glucore is a nutritional supplement that is given to patients daily to assist in maintaining healthy blood sugar and metabolic rates.
**wildgut**
wildgutis a precision-crafted nutritional blend designed to nurture your dog’s digestive tract.
Can you be more specific about the content of your article? After reading it, I still have some doubts. Hope you can help me.
**pinealxt**
pinealxt is a revolutionary supplement that promotes proper pineal gland function and energy levels to support healthy body function.
**energeia**
energeia is the first and only recipe that targets the root cause of stubborn belly fat and Deadly visceral fat.
**boostaro**
boostaro is a specially crafted dietary supplement for men who want to elevate their overall health and vitality.
**prostabliss**
prostabliss is a carefully developed dietary formula aimed at nurturing prostate vitality and improving urinary comfort.
**breathe**
breathe is a plant-powered tincture crafted to promote lung performance and enhance your breathing quality.
**potentstream**
potentstream is engineered to promote prostate well-being by counteracting the residue that can build up from hard-water minerals within the urinary tract.
**hepato burn**
hepato burn is a premium nutritional formula designed to enhance liver function, boost metabolism, and support natural fat breakdown.
**hepatoburn**
hepatoburn is a potent, plant-based formula created to promote optimal liver performance and naturally stimulate fat-burning mechanisms.
**cellufend**
cellufend is a natural supplement developed to support balanced blood sugar levels through a blend of botanical extracts and essential nutrients.
**prodentim**
prodentim is a forward-thinking oral wellness blend crafted to nurture and maintain a balanced mouth microbiome.
**flowforce max**
flowforce max delivers a forward-thinking, plant-focused way to support prostate health—while also helping maintain everyday energy, libido, and overall vitality.
**revitag**
revitag is a daily skin-support formula created to promote a healthy complexion and visibly diminish the appearance of skin tags.
**neurogenica**
neurogenica is a dietary supplement formulated to support nerve health and ease discomfort associated with neuropathy.
**sleeplean**
sleeplean is a US-trusted, naturally focused nighttime support formula that helps your body burn fat while you rest.
Your point of view caught my eye and was very interesting. Thanks. I have a question for you.
**memory lift**
memory lift is an innovative dietary formula designed to naturally nurture brain wellness and sharpen cognitive performance.
Your article helped me a lot, is there any more related content? Thanks!
I don’t think the title of your article matches the content lol. Just kidding, mainly because I had some doubts after reading the article.
Your point of view caught my eye and was very interesting. Thanks. I have a question for you.
Thank you for your sharing. I am worried that I lack creative ideas. It is your article that makes me full of hope. Thank you. But, I have a question, can you help me?
Thank you for your sharing. I am worried that I lack creative ideas. It is your article that makes me full of hope. Thank you. But, I have a question, can you help me?
Your point of view caught my eye and was very interesting. Thanks. I have a question for you.
I don’t think the title of your article matches the content lol. Just kidding, mainly because I had some doubts after reading the article.
Your point of view caught my eye and was very interesting. Thanks. I have a question for you. https://accounts.binance.info/es-MX/register?ref=GJY4VW8W
Can you be more specific about the content of your article? After reading it, I still have some doubts. Hope you can help me. https://www.binance.info/register?ref=IHJUI7TF
**aquasculpt**
aquasculpt is a premium fat-burning supplement meticulously formulated to accelerate your metabolism and increase your energy output.
**backbiome**
backbiome is a naturally crafted, research-backed daily supplement formulated to gently relieve back tension and soothe sciatic discomfort.
Your point of view caught my eye and was very interesting. Thanks. I have a question for you.
**boostaro**
boostaro is a specially crafted dietary supplement for men who want to elevate their overall health and vitality.
**vivalis**
vivalis is a premium natural formula created to help men feel stronger, more energetic, and more confident every day.
**glycomute**
glycomute is a natural nutritional formula carefully created to nurture healthy blood sugar levels and support overall metabolic performance.
**balmorex**
balmorex is an exceptional solution for individuals who suffer from chronic joint pain and muscle aches.
**aqua sculpt**
aquasculpt is a revolutionary supplement crafted to aid weight management by naturally accelerating metabolism
**alpha boost**
alpha boost for men, feeling strong, energized, and confident is closely tied to overall quality of life. However, with age, stress, and daily demands
**prostavive**
prostavive Maintaining prostate health is crucial for mens overall wellness, especially as they grow older.
**nervecalm**
nervecalm is a high-quality nutritional supplement crafted to promote nerve wellness, ease chronic discomfort, and boost everyday vitality.
**hepato burn**
hepatoburn is a high-quality, plant-forward dietary blend created to nourish liver function, encourage a healthy metabolic rhythm, and support the bodys natural fat-processing pathways.
**synadentix**
synadentix is a dental health supplement created to nourish and protect your teeth and gums with a targeted combination of natural ingredients
Your point of view caught my eye and was very interesting. Thanks. I have a question for you.
**yu sleep**
yusleep is a gentle, nano-enhanced nightly blend designed to help you drift off quickly, stay asleep longer, and wake feeling clear
**prodentim**
prodentim is a distinctive oral-care formula that pairs targeted probiotics with plant-based ingredients to encourage strong teeth
**nitric boost**
nitric boost is a daily wellness blend formulated to elevate vitality and support overall performance.
**gl pro**
glpro is a natural dietary supplement designed to promote balanced blood sugar levels and curb sugar cravings.
**mindvault**
mindvault is a premium cognitive support formula created for adults 45+.
**vitrafoxin**
vitrafoxin is a premium brain enhancement formula crafted with natural ingredients to promote clear thinking, memory retention, and long-lasting mental energy.
**vertiaid**
vertiaid is a high-quality, natural formula created to support stable balance, enhance mental sharpness, and alleviate feelings of dizziness
**femipro**
femipro is a dietary supplement developed as a natural remedy for women facing bladder control issues and seeking to improve their urinary health.
**glucore**
glucore is a nutritional supplement that is given to patients daily to assist in maintaining healthy blood sugar and metabolic rates.
**sugarmute**
sugarmute is a science-guided nutritional supplement created to help maintain balanced blood sugar while supporting steady energy and mental clarity
**prime biome**
The natural cycle of skin cell renewal plays a vital role in maintaining a healthy and youthful appearance by shedding old cells and generating new ones.
**tonic greens**
tonic greens is a cutting-edge health blend made with a rich fusion of natural botanicals and superfoods, formulated to boost immune resilience and promote daily vitality.
**gluco6**
gluco6 is a natural, plant-based supplement designed to help maintain healthy blood sugar levels.
**oradentum**
oradentum is a comprehensive 21-in-1 oral care formula designed to reinforce enamel, support gum vitality, and neutralize bad breath using a fusion of nature-derived, scientifically validated compounds.
**biodentex**
biodentex is a dentist-endorsed oral wellness blend crafted to help fortify gums, defend enamel, and keep your breath consistently fresh.
**sleep lean**
is a US-trusted, naturally focused nighttime support formula that helps your body burn fat while you rest.
**provadent**
provadent is a newly launched oral health supplement that has garnered favorable feedback from both consumers and dental professionals.
**finessa**
Finessa is a natural supplement made to support healthy digestion, improve metabolism, and help you achieve a flatter belly.
Hi there excellent blog! Does running a blog such as this take a large amount of work?
I have absolutely no expertise in coding however I
was hoping to start my own blog soon. Anyways, should you have any ideas or techniques for
new blog owners please share. I know this is off topic
but I just wanted to ask. Thank you!
Your article helped me a lot, is there any more related content? Thanks!
Your point of view caught my eye and was very interesting. Thanks. I have a question for you.